Outlook Scheduling Assistant – what is it and how can I use it in Outlook?
 This week’s hint and tip is about the Outlook scheduling assistant and how you can use it when setting up meetings in Outlook. This isn’t specifically covered on our Outlook training course, so we decided to do a hint and tip on it. We are going to go through it now below.
Scheduling Assistant for Creating Meetings
The scheduling assistant is a useful feature to use in Outlook to help you set up meetings efficiently.
This feature allows you to check the availability of attendees for a meeting before you send it out. Arranging a meeting for when multiple people are all free can often be an hard work in companies. So using this assistant can cut down the time it takes to organise a meeting with a group of people.
To use this assistant in Outlook, just follow these steps:
- Firstly set up a meeting and add in attendees but do not send it
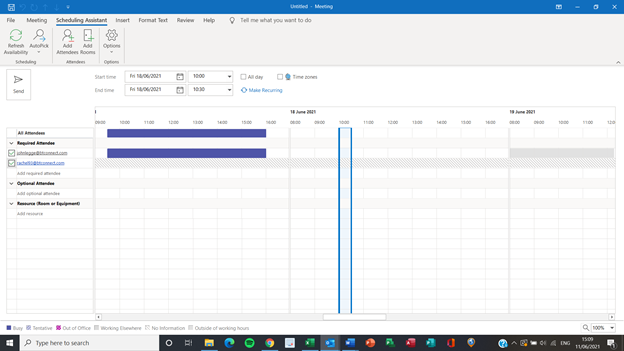
- Once you have done this, then click scheduling assistant tab in the meeting window
- This will show calendars of the attendees you have invited overlaid with the time of the proposed meeting at the top.

If the time of the meeting will not work, you can either change it manually or click on the auto pick option and Outlook will pick the next time everyone is available.
Once you have finished here you can then go back to the meeting tab and check that all the details for the meeting have been filled in and then send it off.
This should have hopefully cut down on the time it’ll take to book the meeting as you will have already worked out dates that do not work for everyone through using their calendar availability.
We hope you have enjoyed this hint and tip on using the Outlook scheduling assistant when setting up a meeting. Why not take a look at our previous one on how to create a meeting in Outlook?
