
Publisher Basics Tables – how to insert a table in a publication
![]() This week’s hint and tip is on Publisher basics tables. We have previously done a couple of some other basics in Publisher, so decided to do another along this series. Inserting tables in a publication is a really useful feature as it gives a different way to display your information. We are going to go through in more detail now on how to use this feature in Publisher below.
This week’s hint and tip is on Publisher basics tables. We have previously done a couple of some other basics in Publisher, so decided to do another along this series. Inserting tables in a publication is a really useful feature as it gives a different way to display your information. We are going to go through in more detail now on how to use this feature in Publisher below.
Where to find it and the options
This option is found on the Insert Tab and on the Ribbon there will be a button called ‘Table’. It is also found on the Home Tab too.

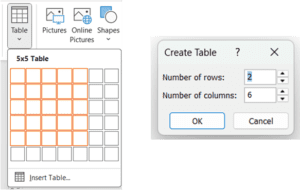
Once you click on this button, you have two options to choose from. You can either hover over the boxes to choose how big you want your table or you can click on the option at the bottom to type in the number of columns and rows you want.
Inserting and editing the table
To insert a table, you choose one of the options mentioned above and decide how big you want your table. Once you have either clicked on the box or clicked OK, your table should then have been inserted into your publication.


Once the table has been inserted, you are given two extra tabs at the top: Table Design and Table Layout. Both of these tabs have options along them for editing your table.
The video below shows you how you can use this feature to then insert it in a publication. Inserting tables is great way of being able to display information in a different way in your publications.
Take a look below at the video to find out more and then try it out on your own computer!
We hope you have enjoyed this hint and tip on Publisher basics tables. Why not take a look at our previous video hint and tip on how to sort worksheets in Excel using a macro?